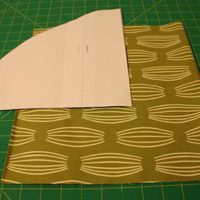
So, a little while ago my husband and I were walking through The Container Store (which I LOVE) and we saw these little shoulder protectors for suits. They are designed to slip over the hanger and keep dust from collecting on your nice suits. I thought they were a great idea, but just looked blah. (Not to mention they were $10 a piece for some plastic!) Then the light bulb went off! I could make my own and choose whatever fabric I'd like to use! Then I could guarantee that they wouldn't look blah! Here's what you need to make yours: 1/3 yard fabric Template (Download here, making sure the 1" boxes print at 1".) Cut out and piece the … [Read more...]
Tutorial Tuesday: Drop Earrings

Mom, if you're reading now, please delete the email and wait until AFTER Mother's Day to visit my site. Thanks! Just to make sure she doesn't see the picture of what may be her Mother's Day gift I included this filler picture of my cat trying to help with the project. What you can't see is that he's sitting directly on top of what I'm trying to photograph! I can't tell you how many pictures never make it into the tutorial because it's got a cat nose, paw, tail, or ear in it somewhere! So for Mother's Day I wanted something simple but useful to send to both my Mother and Mother-In-Law and I think I succeeded! I made them each a pair of … [Read more...]
Tutorial Tuesday: Making Chevron from Stripes

As soon as I saw this stripe from the fabulously talanted Iza Pearl Design (Melissa Ybarra) I knew I had to have it! (It also helps that I've had the opportunity to meet this sweet person as I had the pleasure of teaching her a few sewing classes through CityCraft.) I let it sit with my fabric stash for a week or two (along with some of the other patterns from this collection), trying to determine the perfect project to use it on. The first thing I decided to try was to make a chevron pattern with the stripe. It's super easy to do! Want to try? Layout your fabric on your cutting board. Grab your straight edge and rotary cutter for this … [Read more...]
Tutorial Tuesday: DIY Bobbin Clips

If you sew, you know that your bobbins can go from nice and organized to messy and stringy in a matter of minutes. Case in point: Looks pretty bad huh? And I promise that I made them all nice and neat less than a week ago and didn't make it more messy just for a picture! When you go to get one bobbin out, the others just unravel more making an even bigger disaster! I searched online for bobbin clips to purchase. The only ones I found were for a pack of 10 for almost $10 on Amazon.They included the bobbins too, but they were for Brother machines. I sew on a Janome... Although they use very similar bobbins I didn't want to pay $10 before … [Read more...]
Tutorial Tuesday: Valentine’s Day Welcome Mat
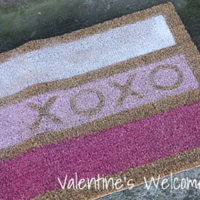
I'm readying my apartment for Valentine's Day. Here's a project I did this weekend that took me less than an hour! You'll need: Blank coir welcome mat (I got mine from IKEA, Target and other stores should have them too.) 3 cans spray paint in various Valentine's Day shades(I used a combination of both flat and shiny paint textures. It didn't seem to matter and you can't tell which were which on the coir. The darkest pink was a shiny finish and the lt. pink and white were matte finish.) white contact paper masking tape Scrap paper Tape around the edges and then divide the center into 3 equal horizontal lines with your … [Read more...]
Tutorial Tuesday: No Sew Valentine’s Towels
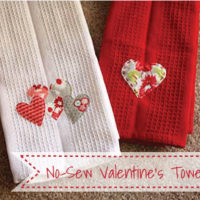
You know I love sewing, but here's a super quick and easy way to embellish some dishtowels with no sewing involved! You'll need: Dish towel (I get mine in a 4 pack from Home Goods. Less than $10.) Scrap fabrics Pencil, Scissors Heat'n Bond Heavy - paper backed fabric adhesive Ready to get going? On the paper side of your heat'n bond, sketch or trace your image. (Remember that if your image has a direction, like a letter, make sure you trace it backwards so it will be the right way when we're done. Some XOXO's would be cute on the towel too!) Roughly cut around your image. Then iron it to the wrong side of … [Read more...]
Tutorial Tuesday: No-Sew Star Banner

Though I used fabric for this project, no sewing is required! Here's what you'll need to make your own star banner: 1 package Heat N Bond (I used Heavy, but Lite will work too.) White fabric Ribbon (Cut out the length you'd like to have, plus 24" extra to allow room on both ends to tie.) Iron Fabric Scissors Star template (Click link to download.) Decide how long you'd like your completed banner to be. *Warning: A smidgen of math is required. You'll place stars approximately every 6", so if you want a 5' banner, you'll need 10 completed stars. Since each completed star takes two shapes you'll need to cut out … [Read more...]
Tutorial Tuesday: Fabric Flower Rings
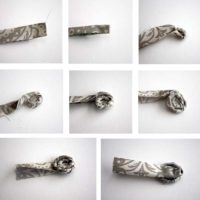
I'm in love with the new ring I just made! Isn't it cute! It's a little fabric flower ring! I love how they only take a very small amount of fabric (or ribbon!) so raid your scraps and see what you've got! You can also use ribbon you've got lying around too! (Here's a little tip for you: If you want to make a custom color of ribbon, try coloring a white or ivory ribbon with your Copic marker. It's permanent and you can make it any color you want to match a project or outfit!) What you'll need: 8" x 1" pieces of fabric strips (or ribbon) Ring blank Hot glue gun Velcro Coordinating beads Tacky Glue Take your … [Read more...]
Tutorial Tuesday: Custom Stylish Luggage
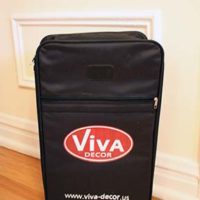
By now you can probably tell that I love to add my own style to things (like the custom passport cover) so I decided that my plain black luggage was also fair game! Well, the almost plain luggage. I got it free, but wanted something a little more "me" for the trip. For this project I used some scrap fabric I had, ironed some heat and bond to the back of it, cut it out, and ironed it onto my luggage! Now I'll know which one is mine! Best part? It's easy! Hand draw your image onto the paper side of the heat and bond, iron it to your fabric, cut it out, and iron away! Really it was that easy! And with that I'll be taking a … [Read more...]
Tutorial Tuesday-Copper Garden Decorations
I found some copper wire as I was cleaning out my garage to prepare for my move and got sidetracked in making some little garden decorations! (Because crafting is WAY better than packing!) These would make great Father's Day Gifts for those fathers that like gardening! Best thing is: They are super easy to make! Both of these took me about 15 minutes total! You can get various diameters of copper wire by the foot at Lowe's or Home Depot. Find a diameter that is easy enough to bend, but not flimsy. Bend them into shapes and leave about 12" of straight wire at the bottom so you have something to stick into the ground. I find that … [Read more...]
