While I'm finishing up my new stamp sets debuting at the end of the month (I can't wait to share them with you!) I thought that today would be a great time to post this wonderful giveaway!The talented ladies behind You Can Make This have a bundle to giveaway to one of my lucky readers. So get out your lucky four leaf clover and enter to win! (It is St. Patrick's Day, right?)I finally had the chance to meet Kim, the owner, at the Mom 2.0 Summit in Houston a few weeks ago. Her sister Kris assists with things at You Can Make This too! (Did I mention that my mom lives next door to Kris? How lucky is she?)Their website is awesome! If you were … [Read more...]
Tutorial Tuesday: Business Card Holder
So I just got back from the most amazing weekend I've had in a long while! I attended the Mom 2.0 Summit in Houston. I met some great new friends, and met a few people whose blogs I've been reading for a while. I had the pleasure of rooming with some amazing craft ladies: Christy and Deb. I also got to room with Surabhi who owns a math tutoring business. You guys rock! I can't even begin to explain the amount of energy there and the amazing women that I got to meet! I finally got to meet my mom's next door neighbor. Can you guess who it is? Here's a hint, her sister owns this site that's super awesome and she assists with it also! I met … [Read more...]
Modern Fabric Bowls
It's in stock now! With the pattern you can make either of these wonderfully modern fabric bowls! It's a PDF available for download in the Schlosser Designs store. For only $3 you can download the pattern immediately! (No shipping and handling either!) The download includes 11 pages of instructions and the patterns with over 15 full color pictures to help you along the process. The pattern is for personal use only, however, if you sew and make items for craft fairs and bazaars you're more than welcome to use the pattern for making limited runs of the bowls. (Just nothing mass produced please!) Have an awesome day! Don't forget … [Read more...]
Tutorial Tuesday: Patchwork Pillow
Yep, lucky you! More tutorials today! (I still have a few more also!) I made this for my dad for Christmas. He loves family history, and he's furnishing his home in Germany right now so I thought he might like this: My maiden name is Williamson so I found a Williamson family crest online, made it a little larger in Photoshop then printed it out onto printable fabric. You can buy these fabric sheets at most any craft store. They are 8 1/2" x 11" sheets of white or cream fabric with a paper backing on it. You just run them through your printer at home and heat set with an iron. The color turned out great! If you want to make one … [Read more...]
Tutorial Tuesday: Fat Quarter Accent Pillows
Oh the weather outside is frightful..... It's been a icy, cold day here in Texas. It was too icy to go into work so I used today to finish up all the Christmas gifts I've been working on. I even took a quick break from making gifts and whipped up some quick new pillows for my sofa: I LOVE this fabric and it has the colors of my home decor in it! Want to make some? It took me about an hour to make both! Here's how: You'll need 4 fat quarters total. 2 of the front fabric and 2 of the back fabric Polyfill stuffing for the inside I just took my fat quarters and made 18" squares with them. Pin a back and a front piece together … [Read more...]
Fabric Pumpkin Update!
Thank you so much everyone for all your comments! I appreciate all of them! I've worked out an alternate top for the fabric pumpkin pattern. This top involves much less hand stitching, well, actually none. If you don't remember how to do a blanket stitch, or want to get your cute little pumpkins done faster than this pattern is for you!Download here.It also involves some slight changes when you're sewing your pumpkin. The changes are as follows:Once you get your pieces cut out, sew them together so you have two groups of three pieces. This will give you two halves of the pumpkin. Below is one half of the pumpkin.Then, sew up the stem with … [Read more...]
Tutorial: Fabric Pumpkins
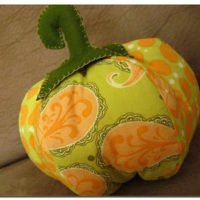
Ok, so I think I'm ready for fall, and in a pumpkin mood.... So here's today's tutorial! Fabric Pumpkins These ones will last you just as long as the pumpkin pets in the previous post, and are a little more lightweight. :) You'll need these three PDF's: Pattern: Panel Pattern: Stem Tutorial Instructions The finished size is about 7" around (not including the stem.) You can enlarge the patterns to make different sized pumpkins. I'm working on one about twice as large and will post a separate pattern for that one very shortly. The larger one will also have a fabric stem as opposed to a felted wool stem. (Thanks to my … [Read more...]
Post #99
So, I tried to post earlier, and then a little later...and blogger was having issues with uploading pictures. And now it uploaded my picture rotated the wrong way... Just one of THOSE days I guess. On to the project: Today I did a little gift for a few friend's birthdays today. I made a little fabric basket, and some homemade granola to go inside. (Click on the items to find the recipes/tutorials.) I made a simple treat bag topper to package the granola. I hope they like it! I do sell the treat bags in my store. They are a great size for homemade goodies! … [Read more...]
July 4th Project
This project is along the same lines of stamping on napkins. I wanted a little more pattern on these ones. Items needed: 1 fat quarter fabric (for those that aren't quilters it's where they take 1 yard of fabric and it cut into quarters) StazOn ink various colors embroidery floss I cut out scraps of a neutral color fabric (thanks again Celia for the scraps!) I stamped the star from the Bough set and hand stitched around the image. I used a french knot at the star points, and a straight stitch for the outline. I used the water soluble pen to write "freedom" and "liberty" and then I free stitched those. I trimmed each one with … [Read more...]
Hand Embroidered Kitchen Towels
I made these for Mother's Day presents. (Hopefully my mom won't decide to make this the week that she checks my blog! The J is for Janet, my mom, and the G is for Gayle, my mother in law.) You might recognize the images...they are from my stamp sets that will be here soon! So here's what you do to make these, using stamps. Just stamp the image with black ink on white paper for the highest contrast. Then find where on the towel you'd like the image to be embroidered. (For these towels I used the cotton flour sack towels. I like how absorbent these are.) I placed the image underneath the area and traced over my stamped image onto the towel … [Read more...]
