Thank you so much everyone for all your comments! I appreciate all of them! I've worked out an alternate top for the fabric pumpkin pattern. This top involves much less hand stitching, well, actually none. If you don't remember how to do a blanket stitch, or want to get your cute little pumpkins done faster than this pattern is for you!Download here.It also involves some slight changes when you're sewing your pumpkin. The changes are as follows:Once you get your pieces cut out, sew them together so you have two groups of three pieces. This will give you two halves of the pumpkin. Below is one half of the pumpkin.Then, sew up the stem with … [Read more...]
Tutorial Tuesday-Quick Napkin Rings
Alright, how about another super quick project? I found this awesome clear transparency "paper" from Hambly Prints (I love Hambly Prints!) and thought it would look really fallish with an orange background. Is fallish a word? Anyway, here are the directions: Cut a 12" long, 1 1/2" wide strip of the orange paper. Cut in half and this will be the base for two napkin rings. Cut a 12" long, 1" wide strip of the transparency paper. Cut this one in half as well. From here, you can make the more modern one, or the one with the ribbon. Modern: Wrap around and staple. All done! Ribbon: Set two eyelets about 1/4" inside of the ends. … [Read more...]
Tutorial: Fabric Pumpkins
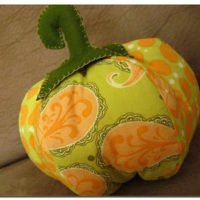
Ok, so I think I'm ready for fall, and in a pumpkin mood.... So here's today's tutorial! Fabric Pumpkins These ones will last you just as long as the pumpkin pets in the previous post, and are a little more lightweight. :) You'll need these three PDF's: Pattern: Panel Pattern: Stem Tutorial Instructions The finished size is about 7" around (not including the stem.) You can enlarge the patterns to make different sized pumpkins. I'm working on one about twice as large and will post a separate pattern for that one very shortly. The larger one will also have a fabric stem as opposed to a felted wool stem. (Thanks to my … [Read more...]
Pet Pumpkin Rocks
So my husband and I carved our pumpkins a little early. :) Why you wonder? Because these are our little Pet Pumpkin Rocks and they will last until Halloween! See that one in the back there? The one with the vampire teeth? His name is Edward. :) So these are SUPER easy to make. You know me, I keep my projects short and simple. The longest time for this one is waiting for the paint to dry. Here's what you need: 1 can each Orange and Green Spray paint Various sizes and shapes medium sized rocks for the pumpkins Smaller rocks for the stems Sharpie Permanent Marker E6000 adhesive To get started, wash and scrub your rocks … [Read more...]
July 4th Project
This project is along the same lines of stamping on napkins. I wanted a little more pattern on these ones. Items needed: 1 fat quarter fabric (for those that aren't quilters it's where they take 1 yard of fabric and it cut into quarters) StazOn ink various colors embroidery floss I cut out scraps of a neutral color fabric (thanks again Celia for the scraps!) I stamped the star from the Bough set and hand stitched around the image. I used a french knot at the star points, and a straight stitch for the outline. I used the water soluble pen to write "freedom" and "liberty" and then I free stitched those. I trimmed each one with … [Read more...]
Valentines Day
This project that I did for Christian was inspired through the Sprite Stitch Blog which I found through Celia's website. Apparently he's a friend of her husband. Cool blog for those who like gaming and crafting!!!! I saw this pattern from his blog and decided to make Christian a little dice bag for Valentines day. I actually have never finished a cross stitch until this one! All the other ones I've started have been pretty big and I've lost interest before finishing so this one was just the right size! It took just about 1 hour to do the cross stitch and another hour to sew up the bag, complete with drawstring and lining. Anyway, here it … [Read more...]
You win some, you lose some…
This week at work there was a contest to see who could design the best holiday mailer. This was right up my alley so I decided to create a few cards to enter into the contest. See below for the cards I entered. (Some are a little non-traditional but if you go to the website of where I work you'll see why) The winner would get to produce all the cards (for a fee of course!) and be credited on the back of the card. It had to be non-denominational and be international as well, since we're an international company. Friday came around and the announcement was made. No-one. Yep, that's right, they didn't choose any of them. And the … [Read more...]
Trick or Treat!
Here's what greeted the Trick or Treaters tonight! My homemade ghost with felt eyes and a bouncy ball head. And my free spooky Halloween tree. I made Christian go with me and find a spooky dead branch at a little area of trees not far from our house. We found the perfect one and I stabilized it with a bucket of landscaping rocks we had in the garage. Next came little plastic skeletons I had and some orange pipe cleaners made into quick squiggles. I think it turned out alright. Next year I might have to try some orange lights. I also had little luminaries lighting the path. Some of the older boys found those amusing. In … [Read more...]
Halloween Wall Art
Here it is: And here's how it's done. It's pretty easy. I used two different FREE downloaded digital scrapbooking kits: Coralee Evans, aka MzCora Halloween Mega Kit found at http://mzpimptress.vox.com. This kit is awesome! So many different papers and embellishments! (She just emailed me and let me know that her site where the Halloween Kit is found is down at the moment. If you leave a comment with your email I can email you the pages that I used to make the kit.) Ronna Penner of Scrapadelic.com ExpressYourself alphabet found at http://www.scrapadelic.com/ (Well, it was found there, but I think it was a limited time only kit for … [Read more...]
Quick and Easy Accent Pillows
Two placemats: (Yes, placemats!) $3.49 each from Kohl'sOne bag of polyester fiber filler:$3.99 from WalmartTwo festive fall accent pillows: Total: 30 minutes and $11.00! All I did was unpick about 5" of the lining on the back off the placemat and stuff it with pillow filling. I stitched it back up and got two cute fall accent pillows! … [Read more...]
